Structures bring model railroads to life. Railroad buildings such as passenger stations, freight stations, engine houses, and section houses provide places for the railroad service and maintenance employees to work. Factories and businesses provide customers. Mines, farms, quarries, and wells yield raw materials that railroads ship. Houses, hotels and mobile homes protect our little people from the elements. Bridges, tunnels, and culverts are necessary parts of rail infrastructure. Fuel facilities keep the trains running.
Selecting Structures for the Layout
Placing a few structures on the layout is probably the first thing the model railroader does once track is laid and trains are running. But a more permanent selection takes some thought and raises a few questions for the beginner. Selecting specific buildings depends on a combination of factors: what is available on the market; what is appropriate for the time and place of the layout; the space available; the ability of the builder to construct kits, modify kits (kitbashing), and build from scratch; and the modeler's vision of what he or she is trying to accomplish.
 San Antonio depot on the Southern Pacific Railroad.
Having a rough idea of the period and of what types of structures would be appropriate for that period is helpful. Structures help define the time and place of a layout. As a good place to start, decide on the architecture and colors you want to adopt for your railroad; a model railroad based on a particular prototype can have a consistent look if the motive power rolls up to a depot with the look and paint colors used by that railroad. Railroads across the country established an identity in part through architecture, for instance, stucco buildings in the southwest. Many railroads had standard plans for stations and other buildings.
Consistency of architecture with the era being modeled takes a little sensitivity to changing architectural styles through time. A layout set in the early twentieth century can include any building constructed before that time. It should not have suburban ranch houses, to pick an obvious example. Locales set well into the diesel era should probably not have a water tank for steam locomotives but could have a foundation for a torn-down tank. Another example is the large concrete coaling towers for steam locomotives that lasted long past the steam era because of the sheer cost of tearing them down, so setting one on the layout gives a sense of history. Similarly, suburban tract houses all seem to look the same across the nation, whereas historic structures tend to be very regional and appropriate models on a layout can establish the desired region. While thinking of structures and architecture for the layout, consider which vehicles and figures are appropriate for the era being modeled. Vehicles can quickly identify a period. For example, horse-drawn wagons alone on the layout date the period to before the 1900's.
Ready-Built Models
Several manufacturers now make model structures that can be taken out of the box and placed directly on the layout. The significant savings in time is offset by the higher cost and limited range of structures available. These pre-built models are fully painted, perhaps with weathering to give them a realistic look. They often have details such as figures, vehicles, appropriate junk and lights. With a little work adding suitable ground covers, they have the potential to create an almost instantaneous mini-scene.
Train shows and the Internet provide a source of ready-made structures built from kits as modelers change focus in their modeling, want to dispose of surplus models, or executors of estates recognize the value in model railroad equipment. Unlike commercial pre-built structures, products assembled by others from kits vary in the quality of construction, finishes, and detailing. Therefore, train shows allow one to see the model first-hand and determine whether size and appearance meet expectations. In addition, there are skilled craftsmen who build models as a business.
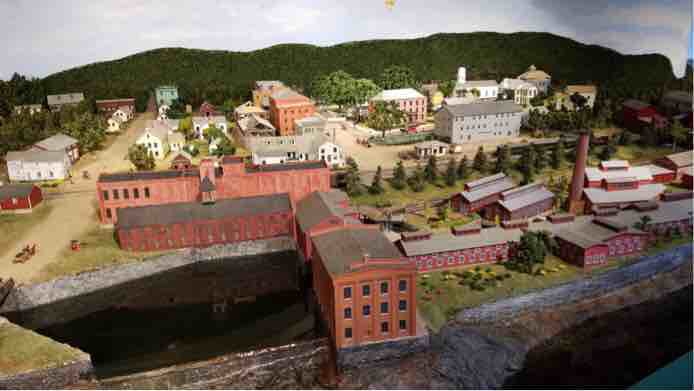 City scene built with a mix of kits and modified kits.
Kits
The wide variety of structures available, at relatively low cost and meeting a range of modeling skills, accounts for kits representing the majority of structures on model railroads. Kits are available in various materials such as styrene, wood, resin, plaster, and card or paper. Most beginners will probably start with styrene kits due to their simplicity and availability. This section will mostly cover basic information on styrene and wood kits.
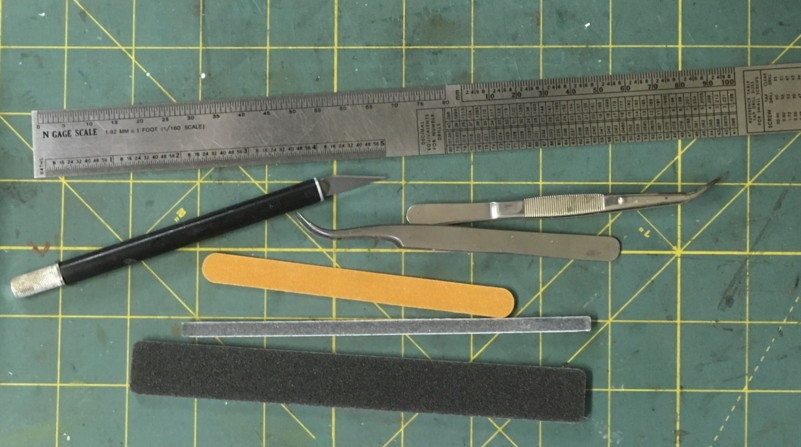 Cutting mat with basic tools for building kits: from the top a rule with multiple scales, an X-Acto knife, tweezers, cosmetic emery stick, and sanding sticks.
Basic tools and materials for building kits include sharp knives such as X-Acto(r) knives, scalpels or razor blades; emery boards, files, sandpaper or sanding sticks to clean up edges and metal castings; a scale rule to use as a straight edge; tweezers to pick up small or delicate parts; glues or cements; and paints. (A more complete coverage of tools for modelers can be found in
Part 11 of this Guide.) For plastic kits a sprue cutter is useful to separate parts from sprues. To protect the surface of your table, you should get a piece of mat board or a cutting mat from an arts and crafts supplies store.
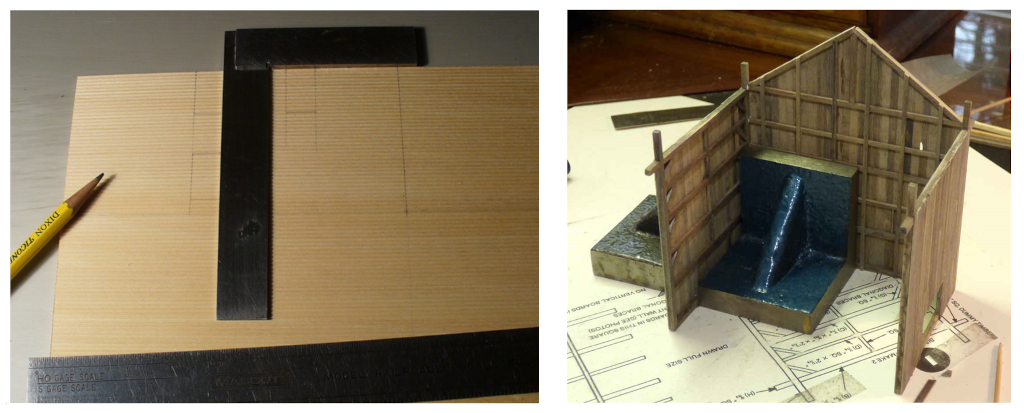 Hobby square and an angle plate.
A small hobby square is invaluable for laying out and cutting walls and openings and for keeping your corners square when gluing walls together.
Angle plates help to ensure walls are glued at right angles and perpendicular to a surface.
Looking at styrene kits, some are as simple as four walls and a roof, perhaps with a chimney. All details such as windows and doors are cast into the walls. The builder might need to clean up the edges a little before joining the walls. Care should be taken to keep the corners square when gluing them together. If the model has a base, it will hold the walls square but otherwise angle plates or a combination of your square and metal weights with right-angle corners can do the job. As with any plastic kit, liquid cement must be kept off visible surfaces. Although less of a concern if the building is to be painted after construction, styrene solvents may mar the surface of raw plastic. The easiest way to glue parts together is to join them and apply styrene cement along the joint with a fine brush, letting it wick between the surfaces, essentially welding the parts together. So, add a couple of fine brushes to your toolkit.
Styrene kits today usually come with separate sprues for walls, doors, windows, and other details, molded in realistic colors. Assembled straight out of the box the structures look attractive and somewhat realistic --for new construction. To increase realism, some weathering could be added as described in
Part 10 of this guide, especially if the structure is to represent a railroad building, a customer served by the railroad, or dwellings and businesses in the grittier part of the city. Even for new buildings, adding a coat of Testors™ Dullcoat or some weathering will cut the unrealistic shine of new plastic.
It might seem unnecessary when a kit has perfectly acceptable colors, but painting some or all of the structure has several advantages. It will cut that new plastic look of unpainted styrene. Second, you might want to use colors typical for your geographic area or era being modeled. For instance, Victorian and early Twentieth Century houses often had a body color plus one or more trim colors, whereas mid-century suburban houses might be painted all one color. Railroads had standard colors they used on their depots, freight houses, and maintenance buildings. Finally, paint customizes your structure so that it looks unique to your railroad.
When using more than one color, painting parts before construction guarantees good color separation. You can build the walls before painting because they will generally be all the same color, but windows, doors and other details can be painted on the sprue. For best results in cementing parts together, either avoid getting paint on the surfaces to be glued or remove paint on these surfaces before joining the parts. You always want good plastic-to-plastic contact for the cement to actually soften and join the parts.
Wood kits range from the very simple to the very complex craftsman kits. Traditional wood kits come as sheets and strips of wood and other materials, as well as castings. The sheet-wood has been milled to look like clapboard siding, board and batten, or planks. Windows and other details are often metal or styrene castings. With some important exceptions, the contents of this type of kit are appear similar to what you would have if you were scratchbuilding. Sometimes the sheetwood parts are already cut to size, perhaps with door and window openings cut out. More importantly, the kit comes with instructions, including detailed step-by-step descriptions of the recommended construction sequence, measurements, plans, diagrams, and templates as appropriate. The builder is saved the time and effort of finding or drawing plans, collecting the raw materials, and figuring out the best a work flow to build the kit, hoping it turns out. The person wanting to learn scratchbuilding might want to start by constructing one of these kits to build gain experience in working with raw materials.
Here are some helpful YouTube links on building wooden kits:
Today's laser-cut kits follow a different approach. The kit typically comes as a set of laser-cut sheets that make up the walls, trim, windows and doors, as well as detail parts of various materials. Structures comprise a sturdy core made up of walls that interlock. Larger structures require bracing on the inside of the core. A modicum of care yields a sturdy substructure with square corners and walls that line up precisely. To this core the builder applies layers of siding and trim made of card, wood or thin styrene. All these components have been cut accurately so that the task of the modeler is to line everything up when applying and gluing the layers. Because walls and windows are built up in layers, the modeler can easily paint the structure in multiple colors, such as in this example of a B&O telegraph office.
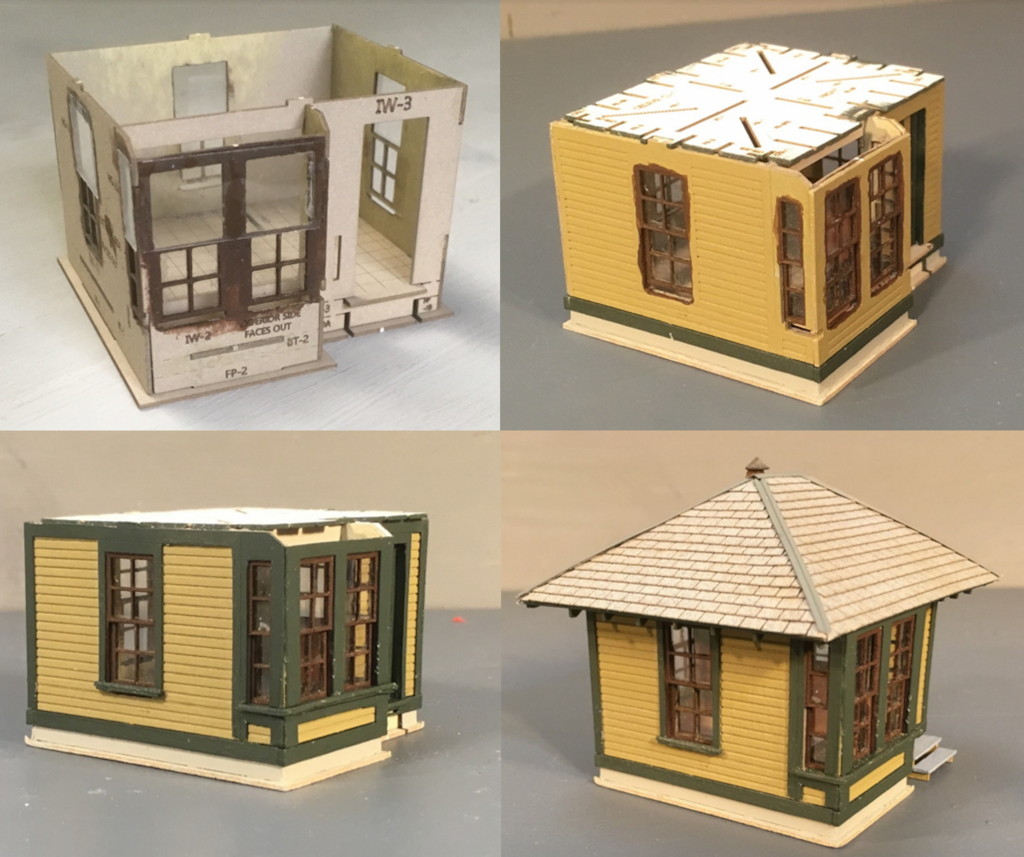 Stages in building a laser kit of a Baltimore & Ohio telegraph office, from the basic core (upper left), addition of wall sheathing (upper right), trim (lower left) to completion (lower right).
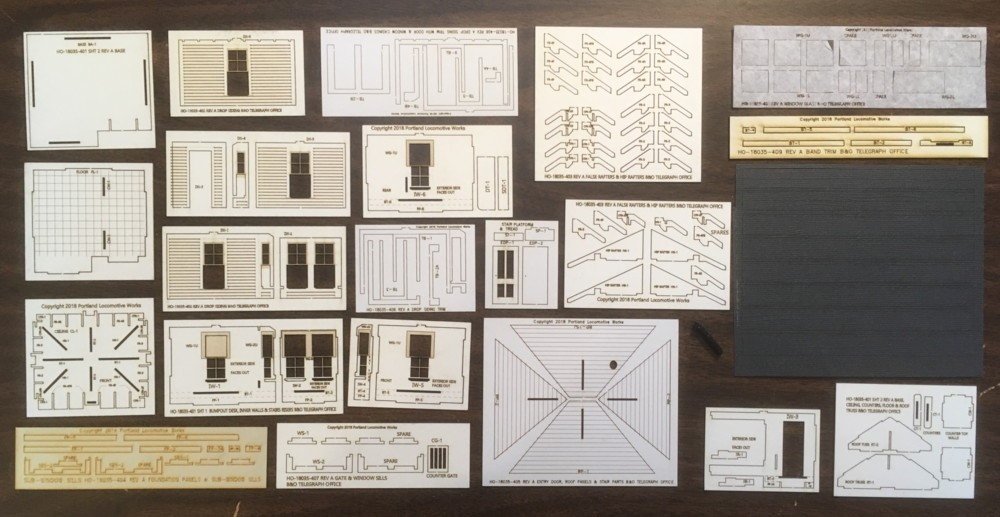 Contents of the kit for building the B&O office shown above.
Wall and trim sections usually come still attached to the surrounding material and the builder must cut them out by slicing through little connectors with a sharp knife. Once cut out, the remaining little pieces of the connectors should be cut or sanded off. Similarly, after the core is assembled, the corners should be checked to see if any of the interlocking tabs stick out and that the structure is square. even the slightest bit. These need to be filed or sanded a little until the wall is perfectly flat and ready to accept the layers of siding and trim.
A wide variety of buildings are available in laser-cut kits, including simulated wood, brick, and cinder block structures. Many are railroad-specific.
Yellow or white carpenter's wood glue is appropriate for both traditional wood and laser-cut kits; the yellow glue “grabs” the surface and sets up more quickly than the white glue. Gluing dissimilar materials, such as plastic or metal to wood or card, is best accomplished with a cyanoacrylate or "superglue" (CA). The gels set more slowly than the ordinary, runny CA. Do not apply glue directly; put a little puddle on a scrap piece of plastic and use a toothpick or wire to transfer glue to the parts.
"Craftsman kits" are considered to be advanced, requiring a lot of cutting and fitting. Many are large kits that include complex buildings or multiple structures, many details, and extensive directions. The more complex kits may include components in resin or plaster in addition to wood, and often can be built up into small dioramas. Building these kits has become almost a hobby within model railroading. In almost every case, today's craftsman kit includes detailed instructions laying out the construction sequence, templates, and methods for staining, painting, and weathering. Due to their complexity, these instructions may actually come as a book, which may be a useful source of techniques for the modeler in future projects.
Finishing: Paint and Stain
Acrylic paints can be used on all structures. Whereas best results are achieved with an airbrush, acrylics flatten well after application so brushing can work remarkably well. Similarly, spray cans work well with but require some care not to apply too much paint at a time. As a general rule, for any type of painting method, multiple thin coats work much better than trying to cover in one thick coat. Non-acrylic paints can also be used if one is careful to check that they are compatible for the plastic being used.
Rather than paint, you can stain wood parts with weathering mixtures available from a number of companies. The builder should take care to keep glue off visible surfaces, because dried glue effectively seals the surface and resists stains. A home-made mixture of India ink and alcohol can be used as described in the weathering chapter of this guide. Even styrene can be made to look like weathered wood by spraying a base layer of a tan to khaki color and staining with an india-ink-alcohol mixture.
Scratchbuilding
Building from scratch allows the modeler to build models not available in kit form, perhaps at a substantial savings in cost and with the benefit of uniqueness. Building a model from scratch requires a plan; a few tools in addition to ones listed above; raw materials including sheathing for walls and possibly castings for details; and basic construction skills.
Plans can be as simple as a sketch with a few critical dimensions. The beginner should probably start with a scale drawing. Good sources for plans are commercial magazines, the NMRA Magazine, and railroad historical societies, either on the Internet or in print. Sometimes a plan of the desired structure can be found can be located similar to the structure desired, requiring just a few adjustments to overall dimensions and style and dimensions of doors and windows.
Photographs can also provide a starting point, especially if a building is extant and all sides can be photographed straight on. If it is impractical to measure the building, you can include a person or a yardstick in the photo for a scale.
Maps such as Sandborn insurance maps provide building footprints for basic dimensions. Some graphics software can correct for perspective. Counting boards of a known dimension on a frame structure or bricks gives vertical dimensions for walls, windows and doors.
Sometimes plans come from inspiration, resulting in freelance models. Inspiration can come from an actual structure, a kit model that is no longer available, or another person's model. For instance, the Synnott Turpentine structure shown below was built from several photos of a model. Because the modeler took a few liberties and used some imagination, there are many differences between the influencing photos: and the final product:
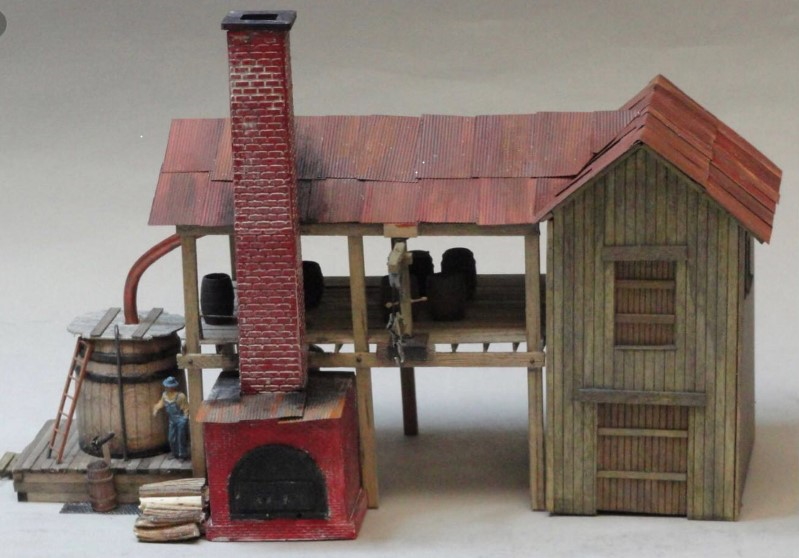 The inspiration for a model still.
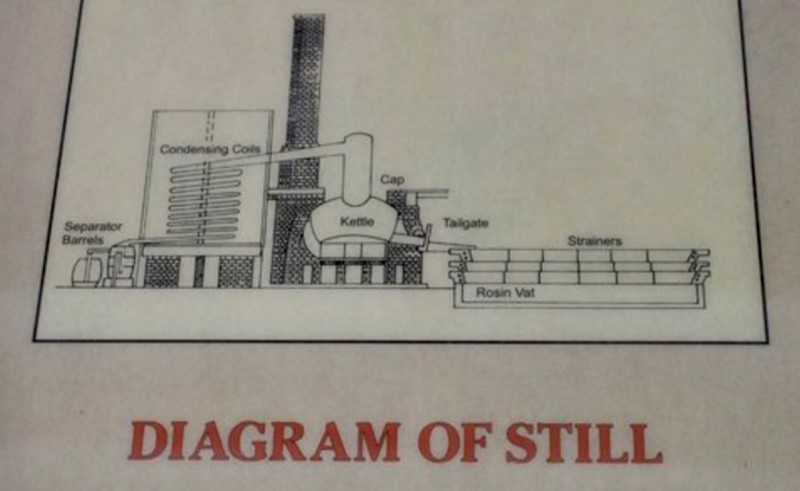 A basic plan for a prototype still.
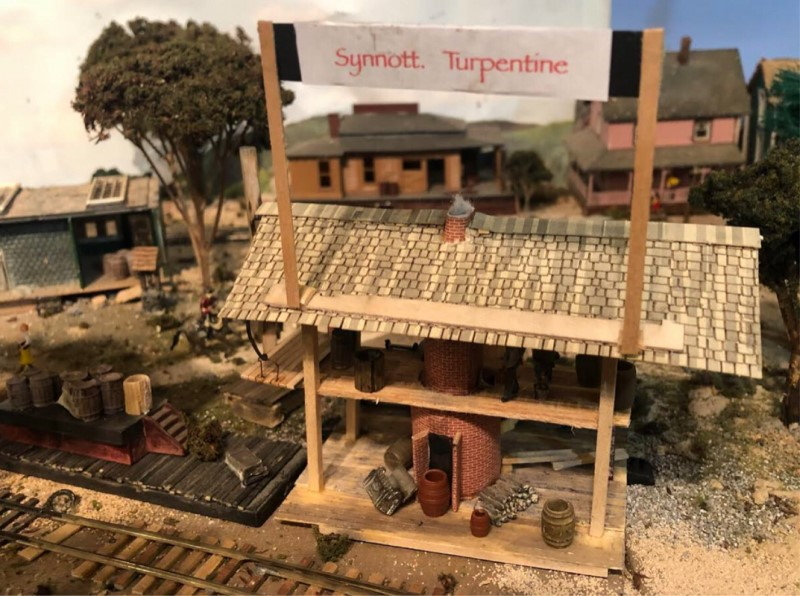 The finished model of a turpentine plant.
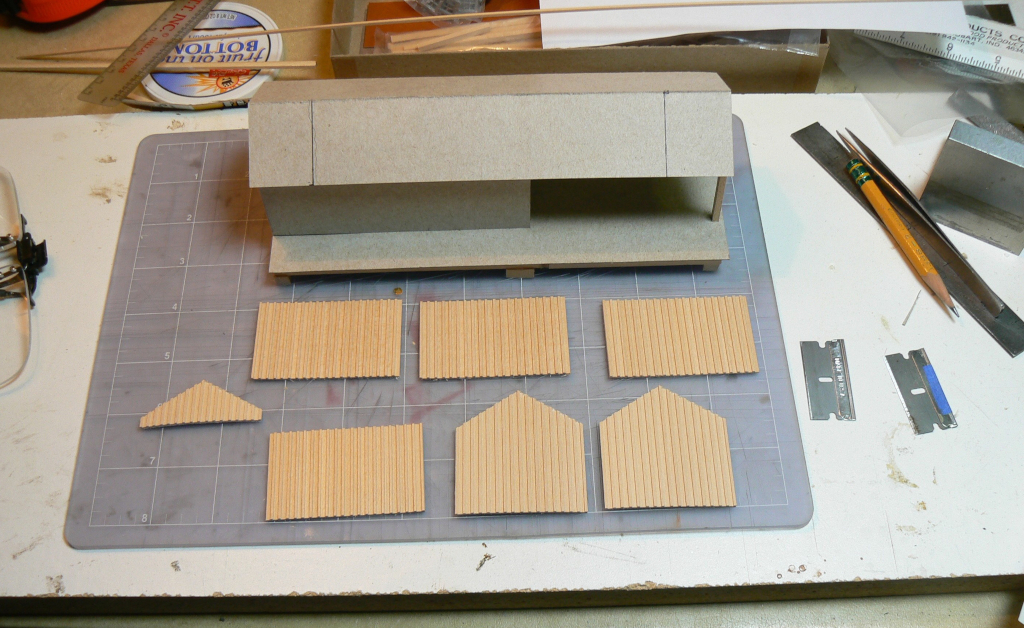 Example of a cardboard mockup and the start for the actual model.
Mockups are provisional, quickly-built models that can help one visualize how a projected structure will look on the layout. Questions can be answered such as:, whether it fits the space, looks appropriate, and seems large enough without unduly dominating a scene. Mockups are particularly appropriate when the structure will be inserted into an already existing scene or the builder wants to try different locations and maybe even different configurations of substructures.
Tools on the scratchbuilder's workbench should include a scale rule or dividers to transfer dimensions from drawings to working materials. A rule with multiple scales is also extremely useful if you build a model in a scale different from the plans.
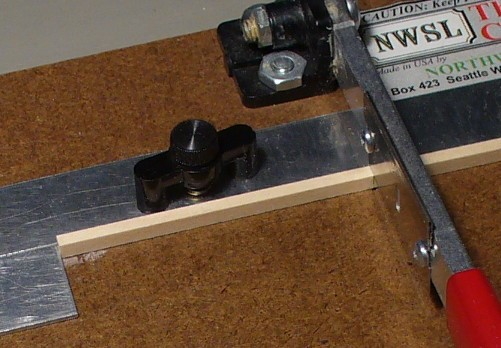 A chopper being used to cut stripwood.
A chopper speeds up cutting multiple pieces of stripwood or styrene strip to the same length. A small fine-tooth saw helps in cutting thicker pieces of stripwood.
There might be occasion to need drill bits and pin vise. Some modelers cut out a window opening by first drilling small holes near each corner, cutting between the holes, and cleaning up as necessary with a file, emery board or sanding stick.
Building materials such as plain sheets of wood and dimensional lumber can be found at popular art stores. Well-stocked hobby shops stock sheets of wood and styrene milled to represent clapboard, board and batten, and plain boards, as well as dimensional (or fractional) lumber (1/8" by 1/8", etc.) and scale lumber (scale 2" by 4"). Other sources are include online retailers and the manufacturers themselves. Most manufacturers of model railroad scratchbuilding supplies will sell directly to individuals.
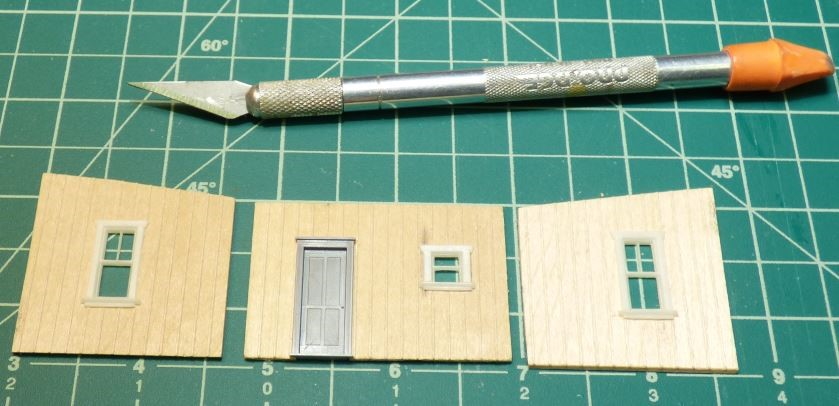 Walls cut from sheetwood with castings used for windows and door.
Details such as castings for windows, doors, chimneys, and architectural features are difficult to find at most hobby stores but may can be ordered from manufacturers.
Building from scratch uses many of the same steps and skills as constructing a kit from sheet materials and castings. That is why for some people building a few kits may provides a step up on the learning curve to full scratchbuilding. Similarly, model railroad magazines run articles on scratchbuilding for beginners with step-by-step instructions, much like those supplied with in a kit.
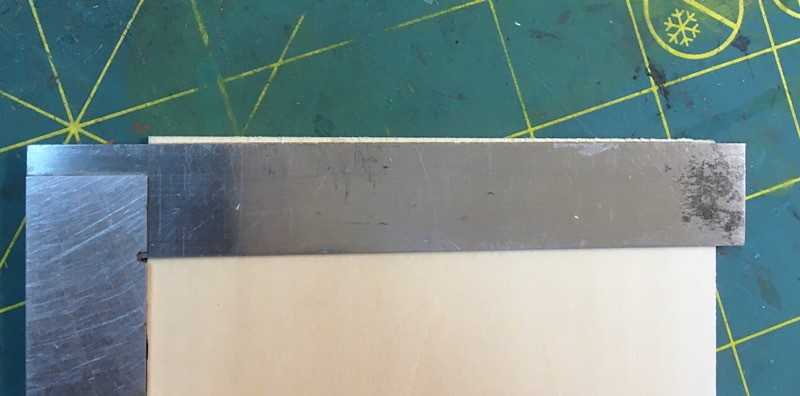 Squaring up sheetwood.
The builder can form several habits useful for both kitbuilding and scratchbuilding that lead to clean, square, and accurate construction. The most important cuts in laying out a wall are the first two you make. Do not assume sheetwood is milled with simulated boards exactly parallel to the long dimension or that the end is true. Edges are often a little rough so it's a good practice in any case to cut a new edge lengthwise exactly parallel with the simulated boards and to cut a new end using the square and the new, clean edge. This might not be necessary, but check with your eye and your square. Styrene sheet milled to look like clapboard or board and batten is usually accurate.
Change knife blades often; even soft woods and especially styrene wear blades out quickly. A dull blade causes the knife to wander and follow the grain, or when cutting stripwood, compresses the wood before it cuts and yields an edge that is not clean.
Use multiple light passes of the knife to cut through sheet material and never force the blade through the material. This is true for both wood and styrene.
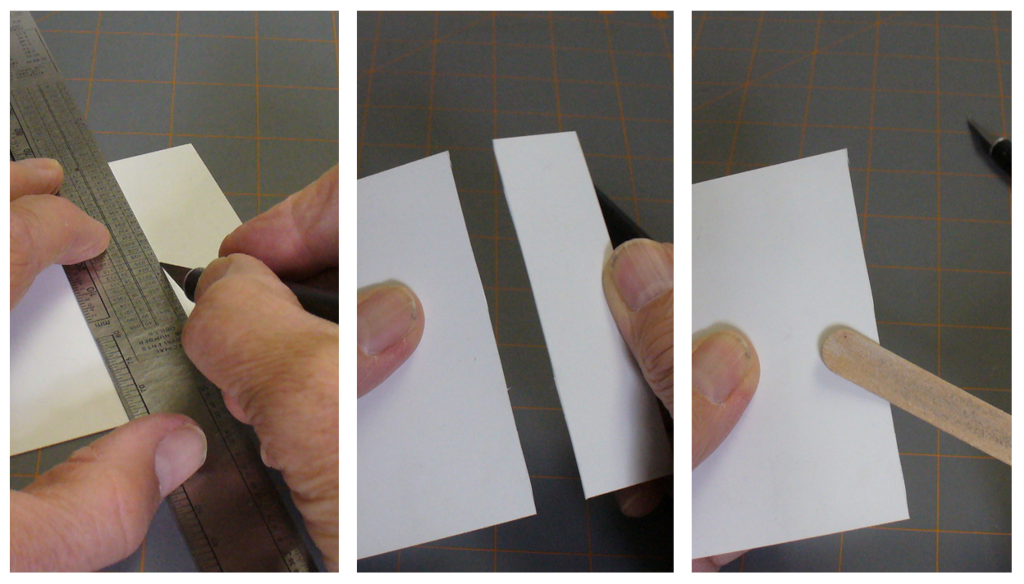 Cutting styrene sheet by first scribing (left), snapping (middle) and cleaning up (right.)
Scribe and Snap styrene. In other words, scribe several times and then bend across the scribed line to snap the pieces apart. Scribing styrene tends to raise a small ridge so go back and clean up the edge with fine sandpaper or sanding stick if the edge is going to show in the model.
Be neat when using glues and cements. Use only as much as necessary. Excess glue can slow down drying time and can squeeze out, remaining unnoticed until dry, and detracting from the appearance of the model, especially if the material has not been pre-painted or stained. Check your work and remove visible glue before it dries.
 Well-braced walls with the sturdy bracing being used as glue surfaces when the walls are joined together.
Brace structures well, especially for the larger scales. By planning ahead, a person can use vertical bracing at or near corner edges to provide glue surfaces. Bracing around the perimeter can support floors. Even if the interior is not to be detailed, floors block light from going through the whole building and can guarantee the building is square.
 Jig for making rafters.
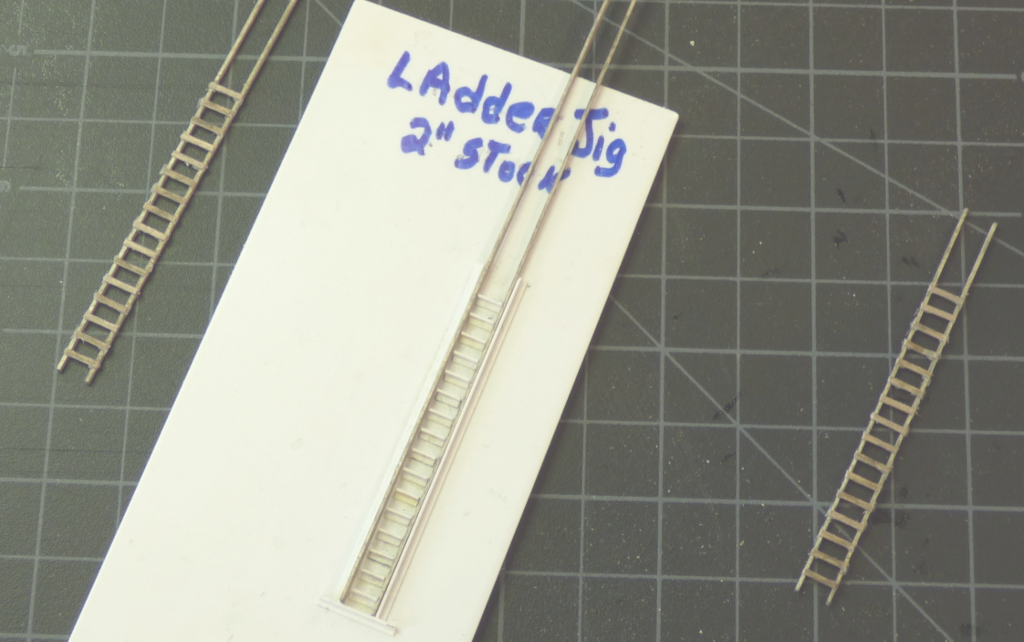
Use jigs to cut out or join components of details when multiples are required, for example the decorative trim under depot overhangs and rafters.
Jigs for such things as wooden ladders (shown above) can be used over and over.
 Adding trim by gluing a long piece of stripwood (left) and cutting the excess (middle), results in a clean, accurate product (right).
Don't try to measure each piece when adding trim to buildings. Cut each piece a little long, glue in place, and cut off the excess. Look at the results and, if still a little long, file off and clean up with a fine file or sanding stick.
Paint major components before assembly to get good color separation. Even if trim and body are to be the same color, painting before assembly avoids those little thick areas of paint that occur around joints and corners.
Brick structures take special consideration. Although modelers can buy laser-cut wood in a brick pattern, the usual method requires covering a styrene substructure with simulated-brick sheet using a water-based contact cement. Alternatively, a solvent-based styrene glue can be used but only around edges of the walls and openings. Trapped solvent can eventually distort the outer skin of styrene.
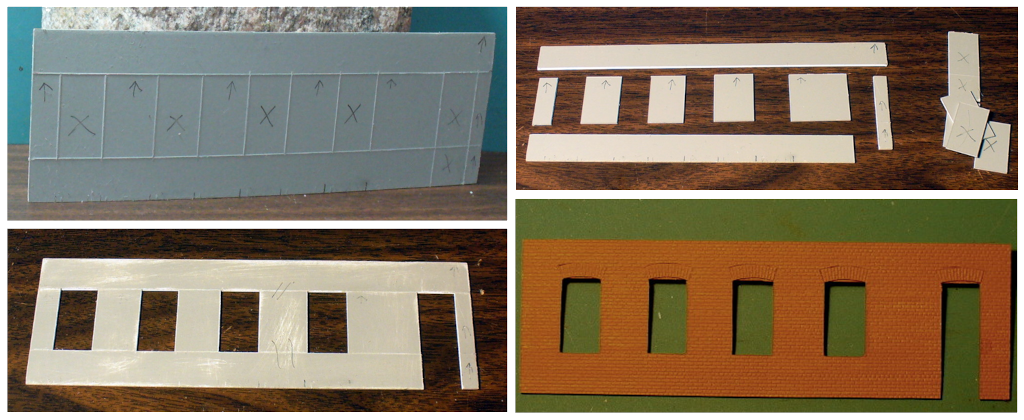 Constructing a masonry wall with styrene sheet for a subwall and a thin styrene overlay with a brick pattern. Scribe lines for windows and doors in subwall (top left), snap pieces apart (top right), glue wall pieces back together (lower left), and glue brick overlay on subwall and cut out window and door openings (lower right).

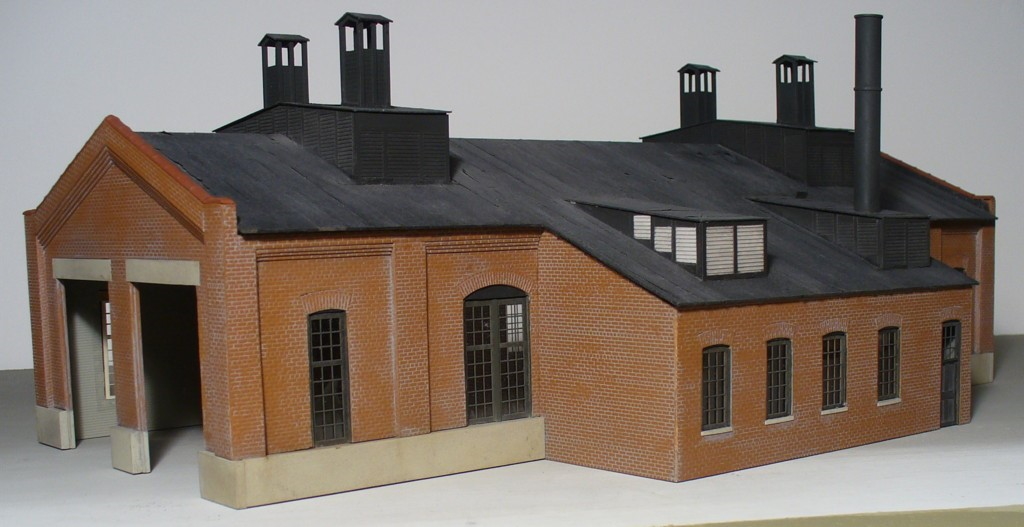
Partially completed (top) and finished model of B&O shop in Rowlesburg, WV (bottom).
Because the brick overlay will hide the subwall, windows can be cut out by scribing horizontal lines at the top and bottom of a complete row of windows, scribing vertical lines for the window sides, and snapping all the pieces apart, keeping track of which bits to keep and which to discard. Walls are reassembled from all these pieces leaving out the pieces where openings will go. The brick sheet is now cemented to the subwall and openings cut out carefully from the back. Windows and doors in brick buildings rarely have trim, but instead are recessed. Castings for double-hung windows are glued on the back, backwards and upside down so that the sashes have the correct alignment.
Styrene can be braced with heavy styrene strip or with wood. Adding floors helps to brace construction and make corners square if fitted precisely. Wood bracing provides a lot of stiffness. A contact cement like Pliobond or Walthers Goo can join styrene and wood. Because these are solvent cements, apply a little evenly along the length of wood; press it in place but remove it immediately, leaving some of the cement on the styrene; let everything sit a couple of minutes until most of the solvent evaporates; and rejoin the pieces. The contact cement really grabs the materials and the wood brace is now permanent.
Brick details can be built in a couple of ways. The furnace in the turpentine factory was made from two wood dowels that were cut to size; and a paper simulated brick sheet was carefully glued on.
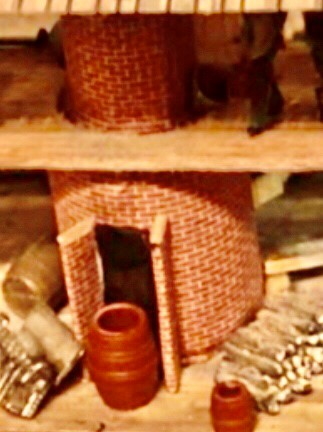 Furnace made from wood dowels with simulated brick paper overlay.
If the brick sheet is thick enough, chimney sides can be cut out, edges beveled, and the pieces glued together.
Board on Board Construction
The beginner might have heard of "board-on-board” construction and wondered what it means. Usually looked upon as an advanced approach to scratchbuilding, board on board construction is the use of scale lumber in a prototypical way by building a frame to which individual boards are added. Building large structures this way admittedly requires a lot of precision craftsmanship and can become tedious for the impatient, but it is nevertheless a useful skill to learn for small building components such as porches and loading docks. Board on board construction is particularly effective for unpainted structures or components because each board takes on a slightly different shade of the weathering stain, unlike the uniformity generally obtained with sheetwood.
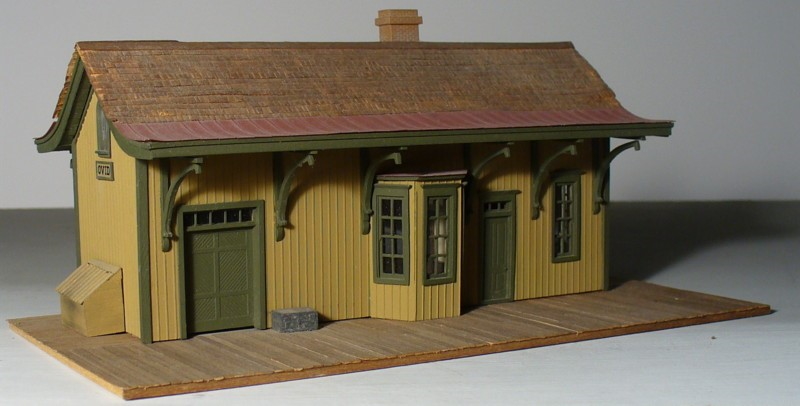
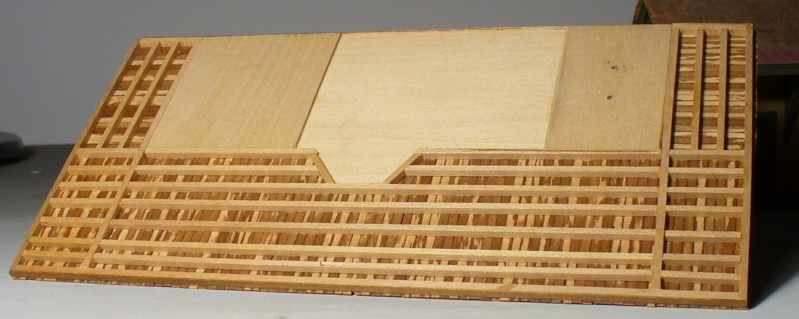
The station platform was built from individual boards for joists and deck, the depot floor from scribed sheetwood.
Using scale lumber also yields more delicate building components. Floorboards for a porch made from scale lumber can be a scale inch or two in thickness rather than the thickness of sheetwood, the most-readily available thicknesses of which approach 3" in O scale and more in HO and smaller scales. The results can be very satisfying even for small components. This depot platform was built by constructing the frame and gluing on pre-stained stripwood. One way to hold frame elements in place until glued is by utilizing double-sided tape on a flat surface.
Many a craftsman kits provides a good entree into board- on- board scratchbuilding. This approach might be used for a subset of components, or throughout the kit. Rather than using individual boards on a frame, some kits have a laser-cut wood shell on to which the builder glues individual boards. Thus, there are ways for the beginner to learn this useful approach to building models.
Kitbashing
Practicing the art of kitbashing ranges from rearranging sub-assemblies of a kit-built structure, cutting off the front of a building to use as a "flat" in the background, cutting up and recombining walls, to mashing together two or more kits. Kitbashing utilizes skills from kitbuilding and scratchbuilding and, the imagination to see visualize a new structure from a kit. , and In addition, the modeler must possess the knowledge of which kits are on the market that can be modified to fit a spot on the layout.
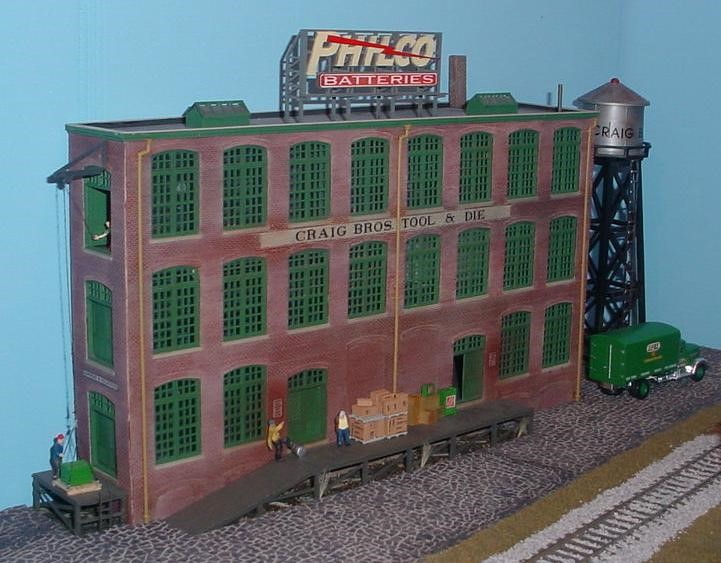 A kitbashed structure built to set against a backdrop.
Layout builders often use shallow, partial buildings set right up against the backdrop to give depth to an urban scene. Using just one wall of a kit against a backdrop is a simple kit modification, but arranging front and back walls of a factory side-by-side to create one long structure and adding downspouts or chutes or other features to hide the seam is a first step to kitbashing. Imagine now gable ends arranged in-line with these wall sections, perhaps with small cut-off sections of walls adjacent to the ends to provide a more 3-D model. Windows could be bricked in, window openings enlarged to accommodate doors.
Kitbashed structures can spring completely from the imagination and can be complex, with many added details and weathering. Urban landscapes call out for such creativity to give the impression of Gotham in a limited space. Kitbashing comes in handy to approximate an actual structure by modifying a kit on the market.
Kitbashing does not ordinarily require special tools. Modifying wood structures is akin to building a craftsman kit or scratchbuilding, but the modeler might want to use heavier knives or even hobby saws to cut up styrene walls. To make sure a planned kitbash will actually work and to visualize the results, you can use a copy machine to make paper copies to be cut up, glued to cardstock, and assembled into a mockup that can be placed on the layout. The temporary structure serves as a stand-in until the kitbash is complete.
Realism
To look realistic, structures should not simply set on the layout. Work the scenery around the base of the structure, such items as grass, dirt, shrubs, trees, roads, and if it's a bridge one needs to add, ballast and the correct abutments. Always disguise the joints between the base of the structure and the ground surface. If the a building does not have a proper basement, consider building one right on your layout that extends down into the scenery; the slight overhang of the structure walls should disguise the joint. Use weathering to cut the shine of newness, and give a house that lived-in look or a factory that worked-in look. Above all, put each structure in a setting that makes sense and with the details and scenery that would logically surround a structure.
These things should be kept in mind if you are going for the
Golden Spike Award. NMRA requirements include the following for structures:
Construct five (5) structures (scratchbuilt, craftsman, or detailed and commercial kits). These structures may be separate, or one or more of them may be part of a single scene. The same comments apply here about the type of kits. The idea is to show that you can do more than glue a simple plastic kit together. Painting or weathering are good things to consider. Remember that "structures" aren't just buildings. Things like bridges and trestles also fall into this category.
Building a few detailed structures from kits or scratch with reasonable neatness and precision, painting them in realistic colors, doing a little appropriate weathering, and working them into your layout in a realistic way should garner you a Golden Spike Award, plus make your model railroad look like an actual, living place.
Additional Resources
Internet searches can yield many how-to write-ups, online discussions, and videos on building kits and scratchbuilding.
Vendors
The NMRA has a
Partnership Program with many vendors that allow NMRA members receive discounts for a wide variety of items such as kits, scratchbuilding supplies, ready-to-run models, etc. More information on this program is available at
https://www.nmra.org/partnerships.


