Background
Many guides for beginners do not touch on the topic of operations. Perhaps the reason is that the topic can quickly become complex. However, having some knowledge of operations can be very helpful in how you design your model railroad. For instance, the location, length and number of sidings, both industry sidings and passing sidings, can be integrally tied into the type of operations you envision. The same can be said of the number, location, size and design of any railroad yards you want to have on your model railroad. One type of yard commonly mentioned when reading about operations is the staging yard. These yards are usually built out of view of the finished portion of the layout and are places where trains can be assembled for later appearance on the finished portion of the railroad during an operating session. If you are not interested in operations, you would probably not build such staging yards, but these yards are much easier to build as part of the original design of a layout than they are to retrofit later on, so think ahead. Even the type of rolling stock you purchase and run on your layout can depend on your decision to operate your layout prototypically or just 'run trains'.
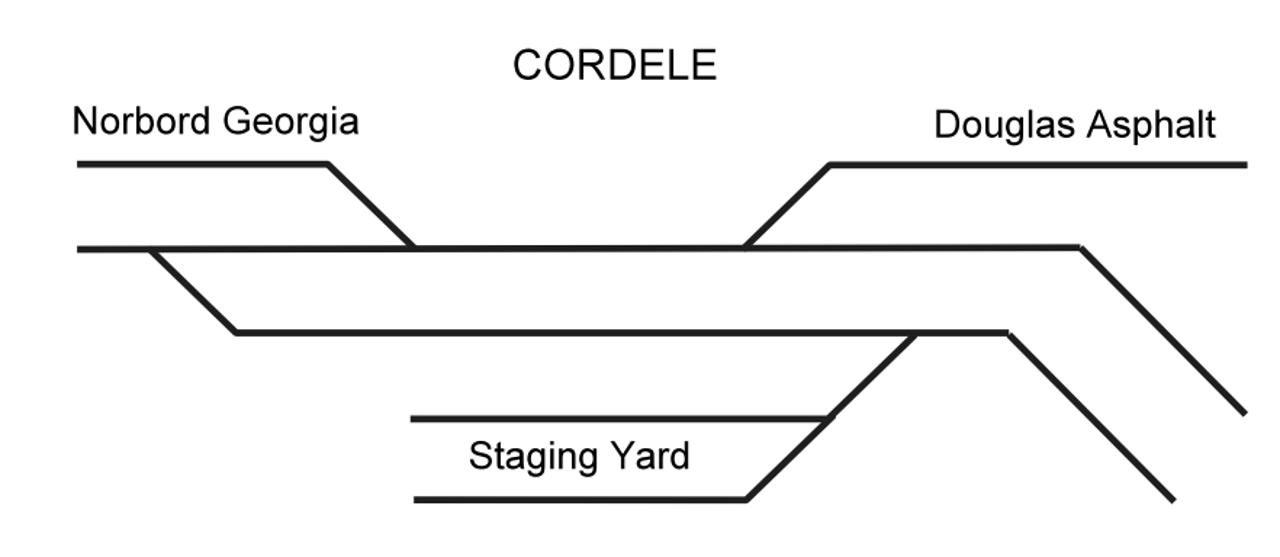
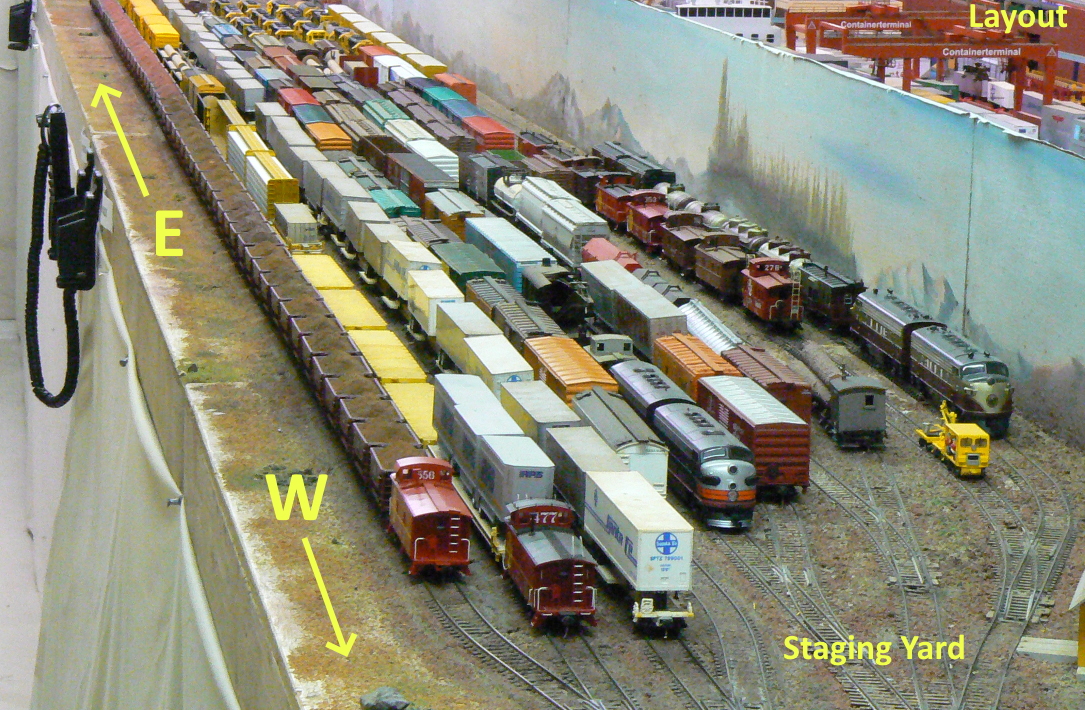 This double ended staging yard located behind the layout allows trains to exit from either end
This section of the Guide should provide you with a basic idea of what it means to operate a model railroad as opposed to just “running trains”. Hopefully that knowledge will also help you design your track plan and select your rolling stock.
Introduction
Operations is doing role play - engineer, brakeman, hostler, dispatcher, etc., to bring life to any size of layout in a somewhat prototypical manner. Think of the model railroad as a theater where the trains are the actors.
Let’s start with a simple example:
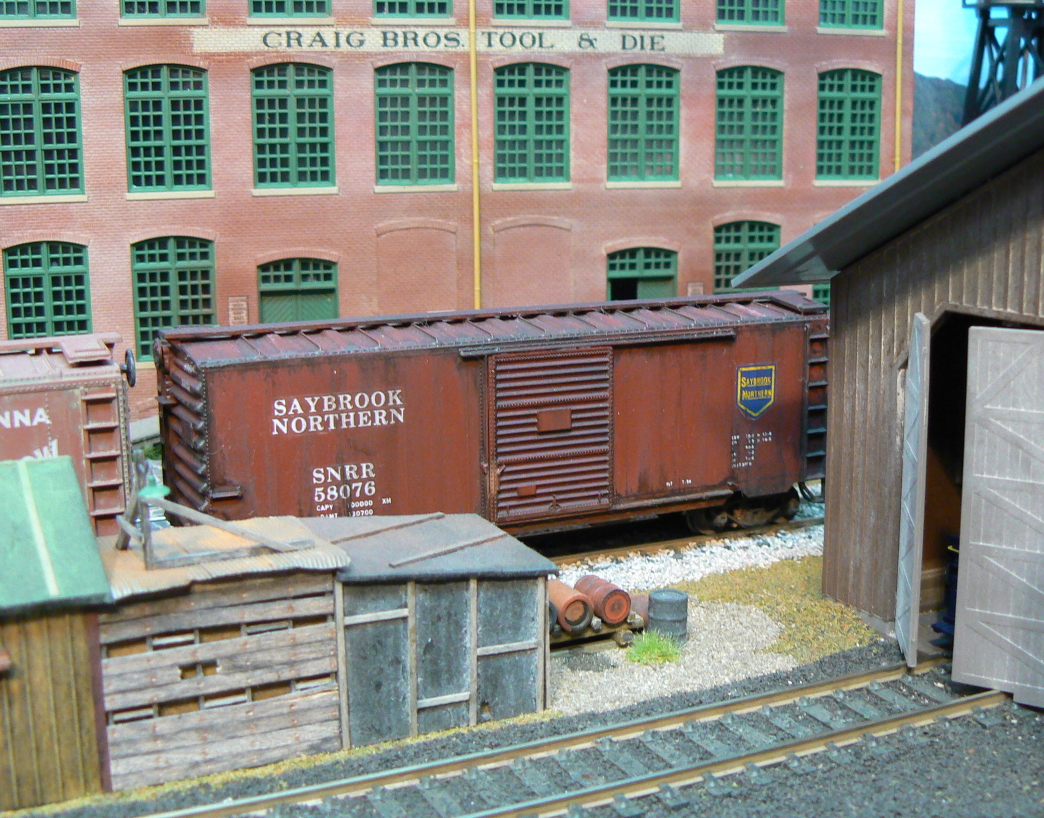
A friend sends you this nicely weathered Saybrook Northern Boxcar to visit your model railroad. You want to send that friend a picture of the boxcar sitting in front of one of your on-line industries to document its time on your railroad. You could, using your fingers, just set the car on the tracks in front of the industry and snap a photo. Or, you could use those same fingers to put the car on one of the arrival tracks in your yard and have your railroad deliver the car to that industry. You will now have to think like the employees of a real railroad think. Welcome to some simple operations.
You think for a minute and decide to pull a switch engine from the back of the yard to make up a small freight train to drop off cars at local industries. In the real world, railroads also receive cars that are not going to any industry on the railroad, but rather are traveling through to "interchange" with another railroad. These interchanges happen either at an interchange track or a shared interchange yard. Looking at your model empire, you see a logical route to take to serve those industries and interchange locations. You realize that putting the cars in a particular order will make dropping them off easier. You set your switch engine to work to assemble the freight cars in that order. If you are running your layout in a time period when railroads were still using cabooses, you pull a caboose off the storage track and add it to the end of the train. Once done, you park the train on the departure track, disconnect the switch engine, and park it out of the way. Now you pull up the road engine, connect it to the string of cars comprising your train and pull out of the yard. You start dropping off cars at the local industries and interchange locations in the order you come upon them. This will often require leaving some of the train's cars sitting on the mainline while you drop off the car. You might have to pick up an empty car before dropping off the new car, so think ahead. In due time you drop off the Saybrook car in front of the Craig Brothers Tool & Die Company. In the end, your train will consist of cars you picked up, plus your engine and the caboose. It is now time to head back to the yard since your job is done. Congratulations! You just finished a simple operating session. Along the way, you took on a number of roles: dispatcher, hostler, engineer, conductor, brakeman, etc.
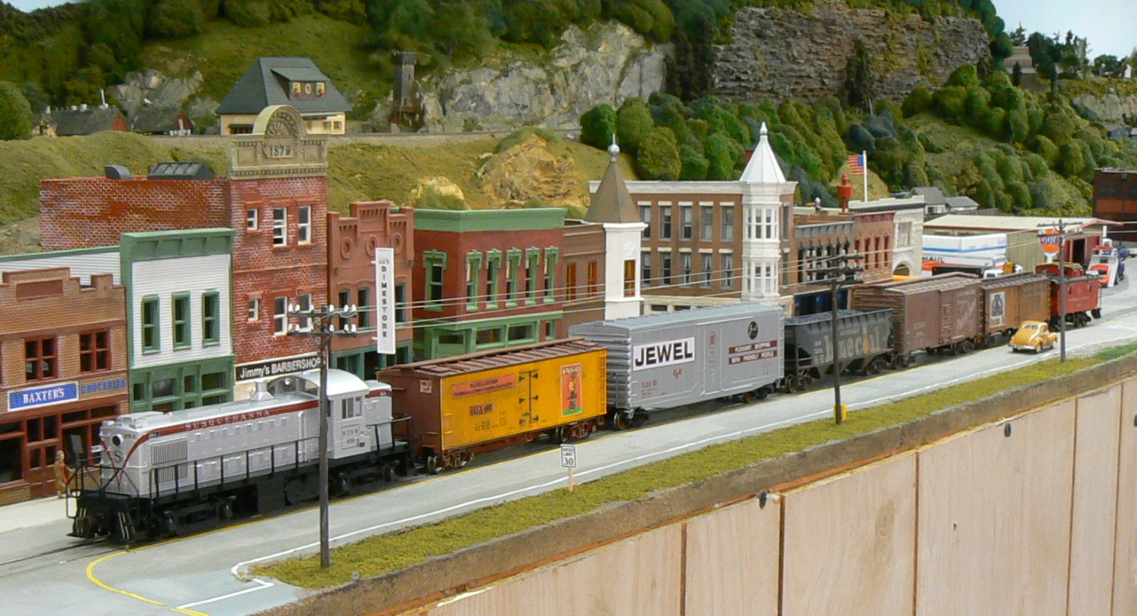 You can have a lot of operating fun with a small local freight train
If you wanted to make the operating session more interesting, part way through the delivery of your freight cars, you could dispatch a passenger train from the yard to travel over the mainline. Since passenger trains have priority over freight trains, you would have to park your train in the nearest passing siding before the passenger train arrives in your location. Once it passes, you could pull out on the mainline and continue your work.
When you get started in operations, remember that it is not about achieving perfection, it is about getting some of the very basics right, like avoiding derailments, stutters and stalls, achieving smooth coupling/uncoupling procedures and ensuring trains move in a realistic manner. Only go to the level of detail, realism, and complexity that fits your comfort zone.
If you operate your layout by yourself that is all you have to worry about. You make all the decisions: what locomotives to use, which cars to include on the run, which industries to serve, when that freight train and the passenger train would leave the yard - where they would meet up and when. You get the idea. Now think about doing something similar with two or three operators. Someone in the yard making up trains. Someone else running the freight. A third person running the passenger train. Either a fourth person or one of the first three deciding when the trains should leave the yard, etc. You can see that those visiting "operators" will need to follow some rules and will need guidance as far as which cars to put in the train, which to drop off or pickup and where. They will also need to know how to avoid blocking the mainline when another train needs to get past and even more importantly, how to prevent a collision with another train. Several main techniques have been developed to help make these decisions and address the scheduling concerns. Each of these techniques have many variations made to fit individual model railroads.
-
Note: Although operations with visiting operators can certainly take place on a model railroad wired in DC with 'blocks and cabs', in general, operators operating on an unfamiliar layout would find DCC easier to use. So, if you envision operating the layout with several others, especially of there will be guest operators, you might strongly think about DCC. If you plan on operating the railroad yourself, or with a close friend who knows the railroad almost as much as you, then DC could still be an option.
The rest of this part of the guide will give a quick look at some of those techniques.
Terminology: Locations and Routes
A model railroad layout when viewed from an operations perspective consists of track, turnouts (switches), and scenery - in particular structures and towns, which provide locations. Each location has a name used to identify it to the train crew, for example in timetables and train orders (more about these below). Examples of locations are: town, station, team track, yard, etc.
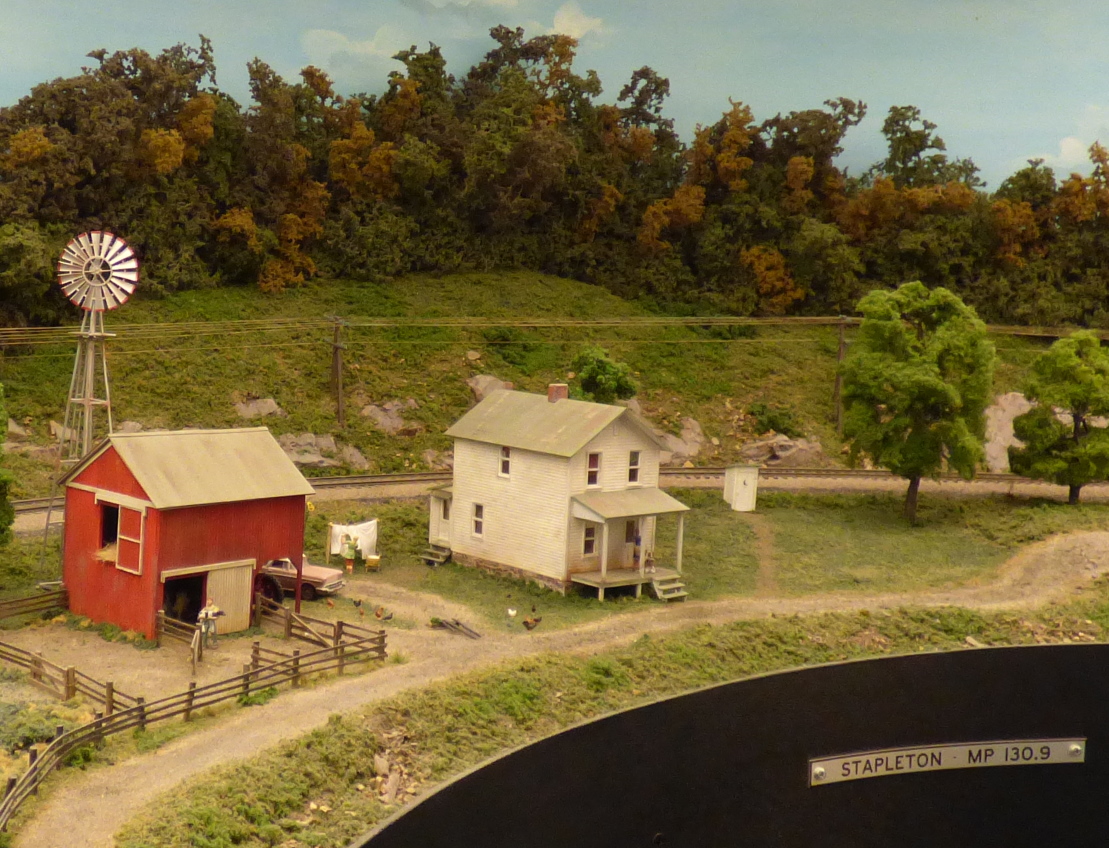 Sometimes a location is identified by a sign on a structure and other times by a sign on the fascia
One or more locations are joined by tracks to form routes. The train crew take their train along a route, stopping as required to simulate passengers or freight joining or leaving the train, adding or dropping cars to simulate collection and delivery of freight.
-
The schematic is not to scale
-
All angles are 45 degrees
-
It includes the names of the tracks and locations. For a large layout, the overall schematic might have a few location names; it is supplemented by schematics for each group of locations, such as a town
-
Detailed schematics typically include mileposts. Model railroads will find travel time more useful.
 Schematic on Gaylord Gill’s Buffalo and Chautauqua S-Scale RR
The Train
Now that we have established locations where trains might stop to conduct 'business' and possible routes to take to reach those locations, it is time to consider the trains themselves.
What do trains do? They pick up passengers and deliver them, they pick up many different types of freight and deliver it, they roll along the mainline, they meet and pass other trains on sidings, they interchange cars with other railroads, they get rearranged in yards, they get serviced on "rip"tracks while the engines are maintained in roundhouses and engine shops, they maintain the track with special "MOW" equipment... the list goes on.
In the real world, railroads do not assemble their trains at random. They are assembled with a specific purpose in mind. In the case of passenger trains, this could depend on the day of the week and time of the day for commuter lines, and the time of the year and destination for long-distance train travel. (Longer trains for holiday travel, or travel from a cold climate to a warmer destination in winter, for example.) For freight trains, it depends a lot on what has shown up on the arrival tracks and what customers on line have told the railroad they need. For model railroaders who participate in operations, these issues are handled very often by one of two techniques or a combination of those techniques: Car Cards and Waybills or Switch Lists. There are certainly other approaches, but these two are good ones for beginners to research.
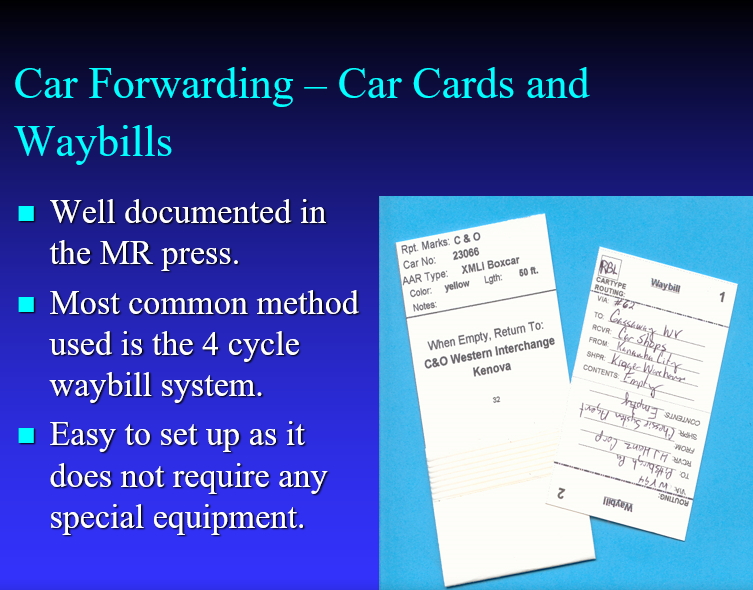
Car cards are probably the most common way that modelers use to send cars to their destination. The car card typically includes information identifying the car and can include road name, road number, perhaps color, other description, or even a photograph. The card is folded up to form a pocket that is a bit hard to see in this photo. The waybill indicates where the car originates and its destination as well as any routing instructions. When it arrives at its destination, it is usually turned to the next position and put back in the pocket of the car card.
The train crew carry the car cards and waybills with them as they move the train, leaving and collecting them at each location to match the cars that have been picked up or set out. Layout owners who use car cards and waybills will often have convenient card holders mounted on the fascia anywhere pick-ups or set-outs occur. Since there is a car card for each car in the train, a long train can mean a big stack of cards. While handling a throttle, radio, and a pile of cards, it is easy to drop something, and if it's the cards, you can spend valuable time putting them back in order. Many veteran model railroaders wear a waist apron with pockets to hold car cards and other items.
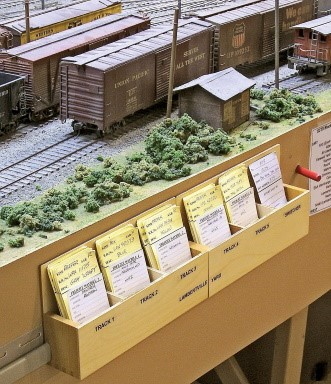
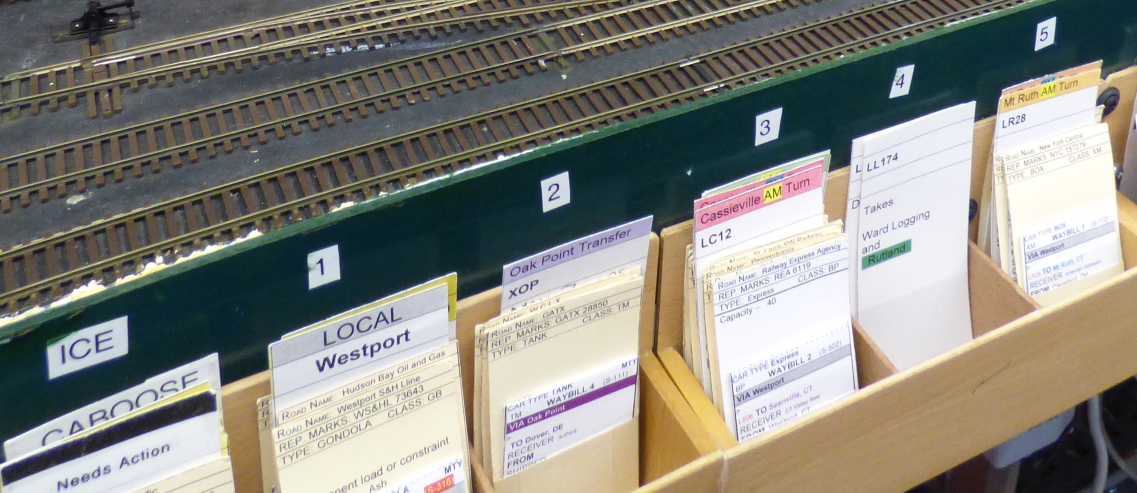 Car cards and waybills being set up for several departing trains in a main yard
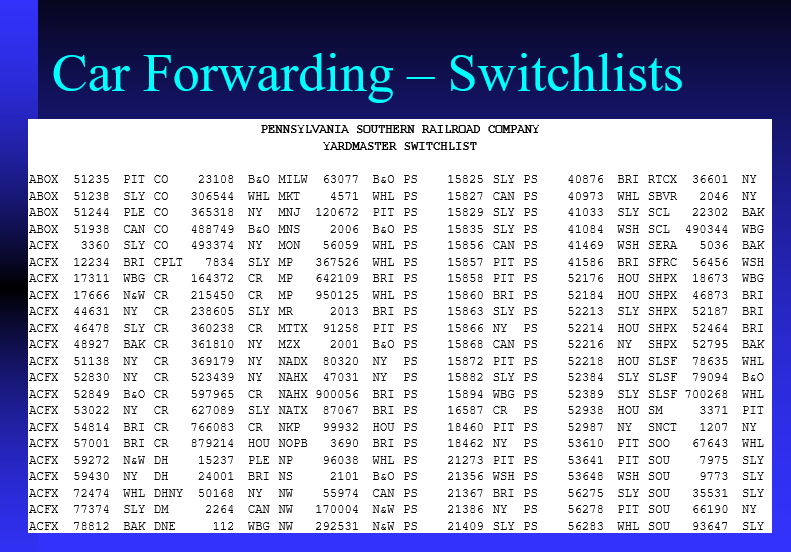 Switchlists are just a piece of paper with instructions for what to do with a car.
The illustration here is for the yardmaster on a particular model railroad. This is only part of a longer sheet that lists cars and their destinations, as a three-letter code. That's enough for the yardmaster to sort them into the right tracks to build an outbound train. Note that it does not tell the yardmaster what industry a car goes to, just the town. The yardmaster really doesn't need to know that detail and it wouldn't fit on the sheet anyway.
Some layout owners use switch lists. They can take on many forms The switch list may:
-
Instruct the train crew of pick-ups and drops at each location
-
Provide information on which cars are selected for a train and the route to be taken by the train
-
Informs the crew of the order of cars in the train to aid in efficient switching and perhaps to follow the rule book; for instance, cars carrying dangerous materials are placed further away from the locomotives
The
Traffic Master provides information for yardmaster, who selects and blocks cars on the departure track. The
Conductor or
Yardmaster creates a switch list from the train by selecting the sequence of cars groups of cars (blocking) based on the route and the rules for where cars are allowed in the train. See:
http://www.gatewaynmra.org/2004/essence-of-model-railroad-operations/
Dispatching Systems
Once trains are assembled and ready to leave the yard and travel the rails, you need to think about ways to prevent trains from crashing into one another or end up blocking each other from traveling their intended route. You now enter the realm of the Dispatcher and dispatching systems. Once again model railroaders look to the real railroads for guidance. In the real world, the techniques used by railroads evolved as available technologies changed. Timetables and Train Orders (TT&TO) were widely used in the real world up through the late 1970's to early 80's. Then there was a transition to Track Warrants/Direct Train Control and finally to Centralized Traffic Control (CTC). CTC requires electronic signaling and train detection circuits. These can be costly and a detailed discussion of them is definitely beyond the scope of this Guide.
Once a train is assembled and dispatched, the following sample train instructions cover the typical actions of an operating session:
-
Prepare the train at the start location
-
Start at the appropriate time
-
Stop as required at locations, main line, siding, arrival track at yard
-
At each location do the necessary work
-
Get authority to restart if applicable, for example following a meet or pass
-
Repeat from step 2 or finish
The train instructions can be brief or more comprehensive, depending on the experience of the crew. They should only apply to that particular train.
-
Provides information the train crew needs to know and gives authority to leave the current location as well as where to stop for new authority
-
Gives the route, that is the sequence of locations: towns/stations, yards, sidings, industries/spurs etc.
-
Specifies the direction of travel, such as north, inbound, and so forth
-
Tells where to check with the dispatcher that it's allowed to continue along the route
Train orders usually give special instructions such as the locomotive assigned to your train, especially for trains not on the timetable. They are conveyed with specific train order forms such as Form 19, Form 31 and so forth. Typically, the train crew must stop the train and sign Form 31, whereas Form 19 can be handed to the train crew member “on the fly.” The train order may be modified by "chance cards", for example giving speed restrictions or instructions to remove a car from a consist because of a fault such as a hot box.
When to depart
There are several ways for a train crew to identify when they should depart with their train:
-
To follow the sequence: As each train reaches the end of its route, the next train is started.
-
If multiple trains are required on the layout then either someone is required to give the order to proceed (typically a dispatcher) or a timetable is required to indicate when the train in the sequence will be run using the layout clock or "real" time.
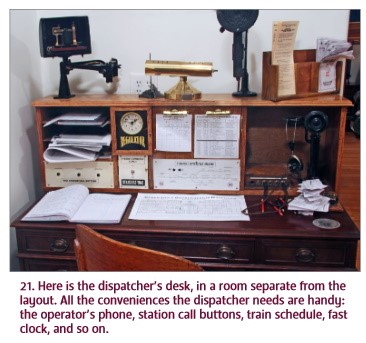
Dispatcher
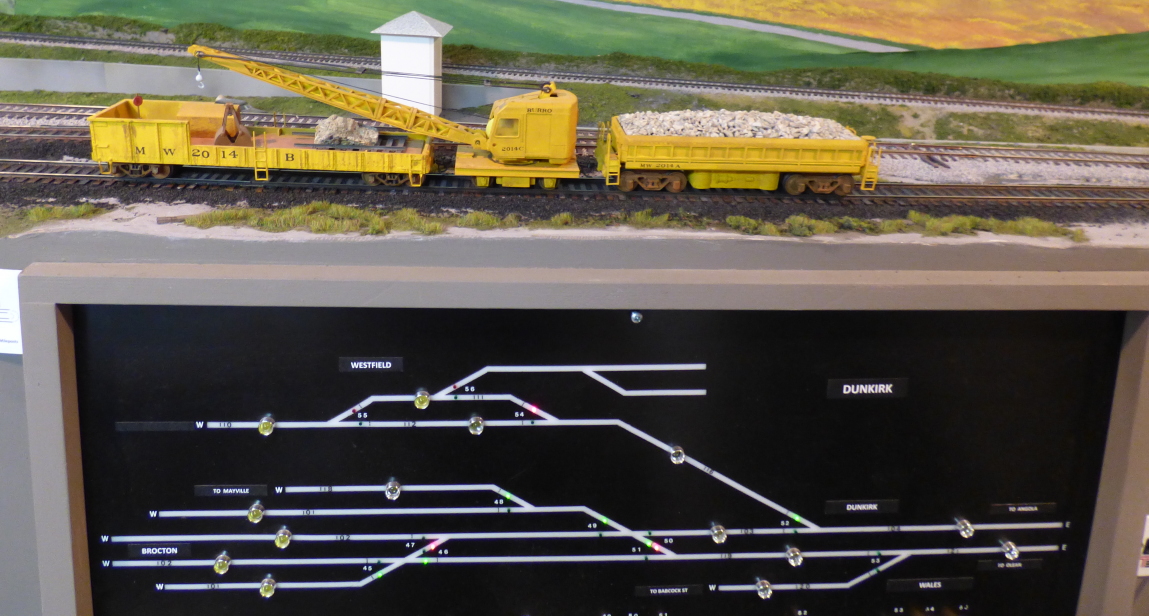
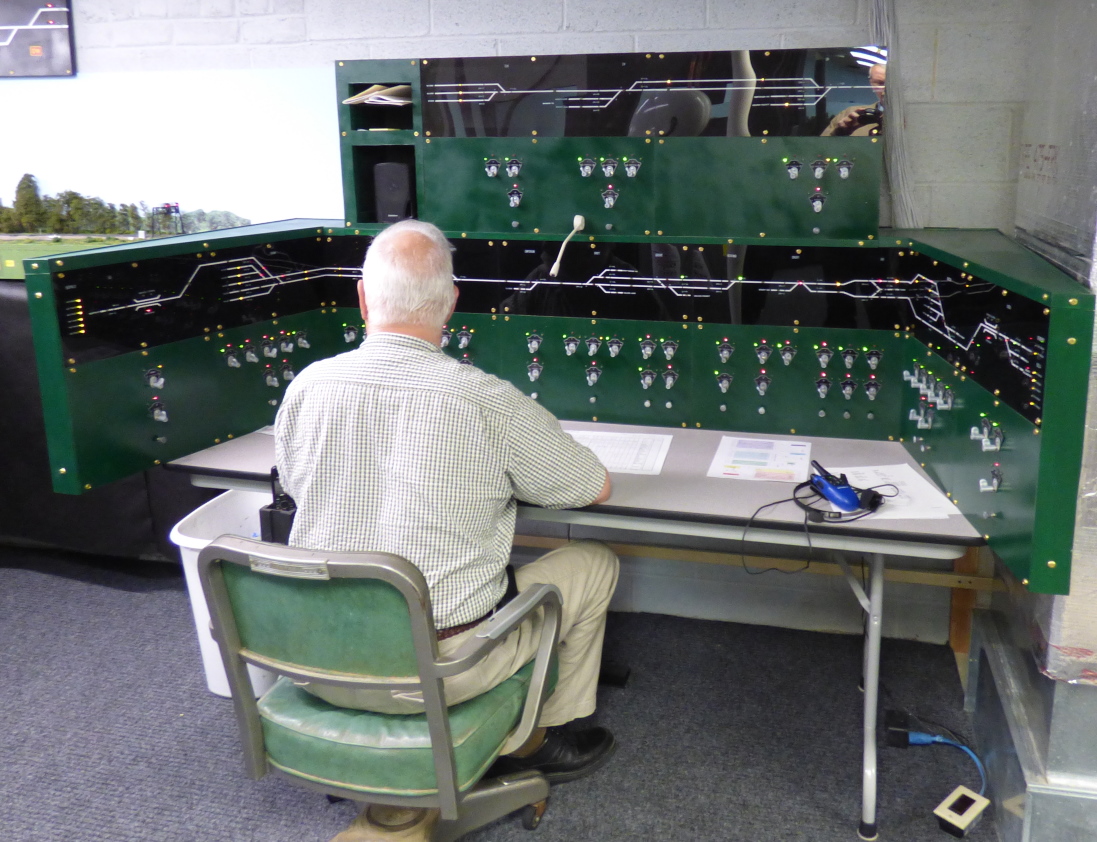 CTC Controls on Steve Mallery's PRR Buffalo Line
This type of operation allows the dispatcher to set the routes and command the trains to move with the assistance of some (prototype like) electronics.
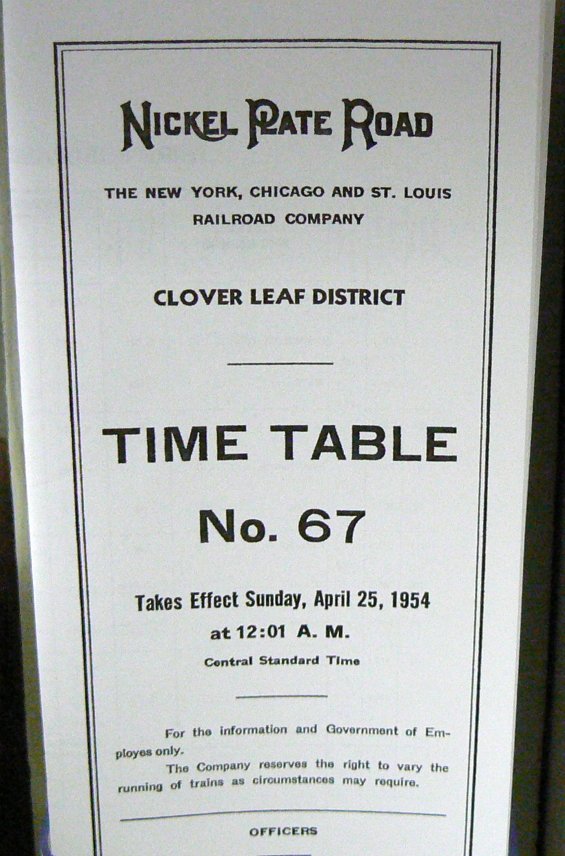
Timetable and Train Orders (TT&TO)
The timetable specifies:
-
Train number
-
Type of train
-
Route of the train
-
Locations where it needs to stop with arrival and departure times
-
Train priority: for instance, passenger trains usually have priority over freight trains, and express trains have priority over local switchers
The timetable can also include information such as the maximum length of train that sidings along each route can accommodate. Prototype timetables can often be found at train meets, from railroad historical societies, and on the Internet.
Creating a Timetable
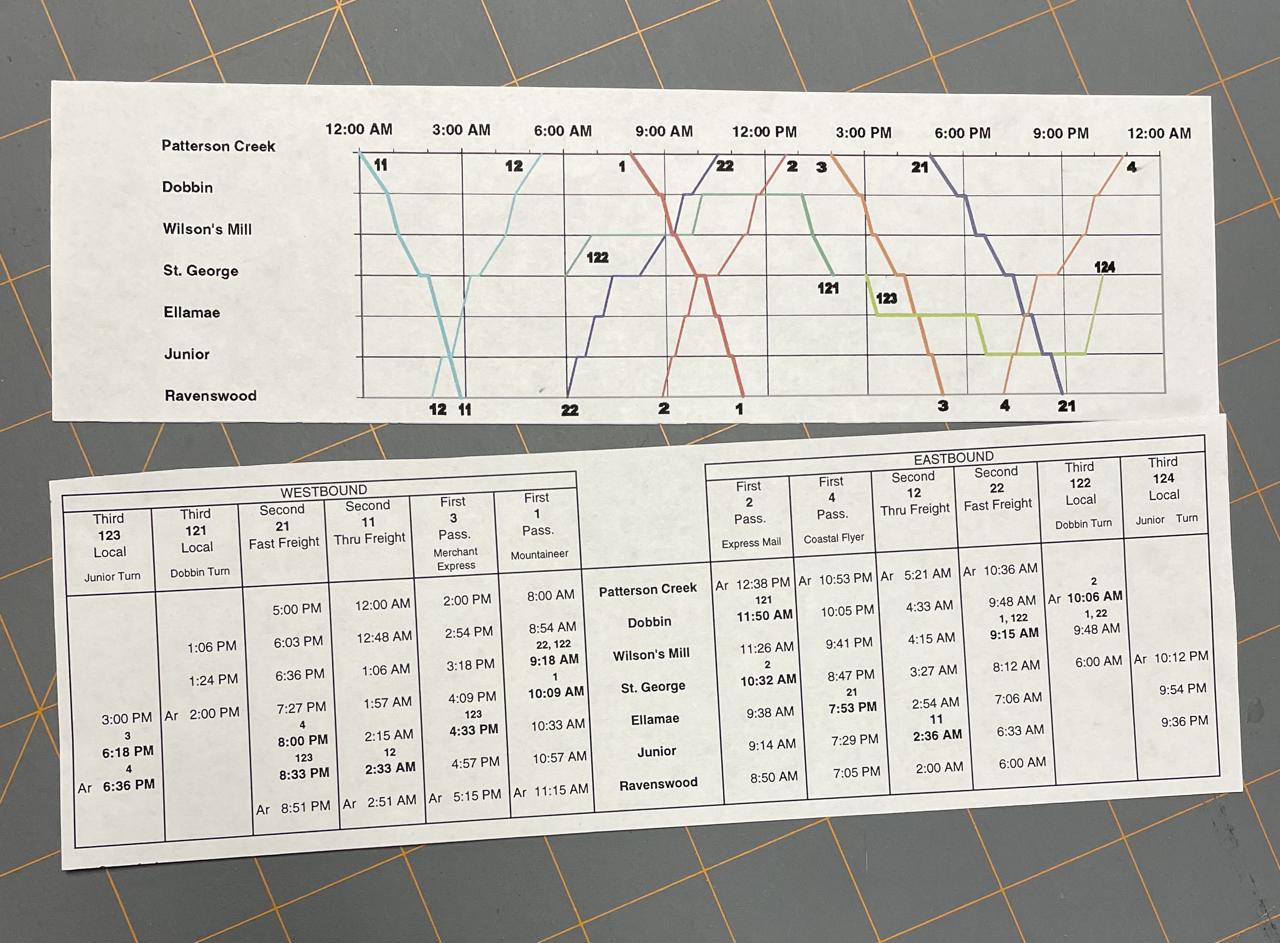
A timetable combines the sequence of trains with assigned times to control the frequency of service and to facilitate meets and passes without mishap with minimum delay. It may be obtained from the prototype railroad or it can be created based on graphs known as string charts:
-
A string chart is a scatter chart with lines between points
-
Each train is a set of data points; the axes are cumulative distance and time
-
Lines may only cross where there are dual tracks, a siding or a yard
-
Wait times are horizontal lines and should be at an appropriate location
Time: the Layout "Fast Clock"
On an actual railroad, a train might take a half hour to go from one town to the next. However, on our model railroads the distance between those two towns is dramatically compressed. It is clearly not going to take a half hour to get from one town to the next. If operating one train as an individual, this difference in 'real time' and 'model time' is not a big issue. However, when there are multiple operators running multiple trains simultaneously, time must be synchronized across all the trains. If everyone follows a layout clock, possibly running fast, it allows time to be compressed or even reset whilst keeping everybody synchronized.
Meets and Passes
At a location where trains must pass, the train order or timetable indicates whether the train crew is to enter the location and then enter a siding to wait for the opposing train to pass on the main, or the train crew is to pass through on the main. The sequence of trains or the timetable must ensure that the train which has to wait arrives first.
There is normally a set of rules establishing superiority by direction and by class. In other words, governing priority at locations where they meet. Typically trains moving in one direction, say westbound, have priority over eastbound trains. In such a case, an eastbound train at a location waits on a siding until a westbound train has passed. Similarly, the lowly freight must clear the main and wait on a siding for a Class 1 passenger train to pass.
Following a Train Across a Layout
A train may not enter the next location unless either the train in front has gone; or following established rules the train can be stopped before a collision. For example, this may allow the second train to be brought to the first so they can be connected to form one train. Whether and under what conditions a train may proceed can be governed by the timetable, a signal, or train orders. For example, the time for departure is set by the timetable, but a train order modifies the time for departing, and a signal set by an operator tells the engineer they can actually start.
Stops and Switching
The railroad interacts with its customers at locations. An interaction may be a stop and restart and may include delivering cars from the train or collecting cars to add to the train. If no interaction is required the train passes the location.
To provide space at a location, the train crew should pull (lift) cars from a siding before dropping cars. At the start location the train lifts all the cars. At the destination location the train drops all the cars. A location may have multiple spots for each car being dropped. For example, opposite doors on a warehouse, underneath a loading shoot, etc.
Faced with the task of picking up and dropping off cars at a location with many tracks and customers, the train crew works as efficiently as possible. The engineer is guided by the conductor in a two-person crew in a sequence of moves. The engineer should use the throttle in a realistic way. Movements required to do the work can become a switching puzzle:
https://model-railroad-hobbyist.com/magazine/mrh2018-04/switching-puzzle
These articles on the web provide tips and examples:
Setting The Route: Putting The Switches In The Correct Position
There are a number of options, and more than one is possible on a large layout.
-
Train crew sets the switches in each location as they travel the route, ensuring the switches are set back to their default position when switching is complete
-
Tower (signal box) operator sets the switches on their control panel as required for each train's route at the correct time under direction of the timetable, sequence, or dispatcher. The tower operator also communicates with Engineers as appropriate, reports train going through their location to the dispatcher if required, and warns the train crew if they are sharing the track with another train
-
Dispatcher uses a control panel to set switches
Conclusion
We will conclude this discussion of operations with a more detailed description of the roles fulfilled by different participants in an operating session. The use of these roles and their scope depends on how much of the prototype processes you are doing beyond the boundary of the model layout. See here for more discussion:
http://blog.thevalleylocal.net/2020/07/piercing-fourth-wall.html
In particular it should be realized that railroads had many more clerks than employees in any other role. Their primary goal was to get information to the point where yard masters could make up trains.
The Engineer:
-
Has locomotive throttle and other controls, for example reverse, horn, lights, etc.
-
Controls the train's speed to stay in the track they are authorized to occupy and obey track speed limits and when appropriate ensure that the train can stop before hitting another train sharing the same area of the layout.
-
Stops at locations as required by train order or timetable
-
Performs switching (shunting) to collect or deliver cars as required by conductor or yard master or a script if those roles are not being used.
-
Performs brake tests, steam blow down, etc.
-
To the extent allowed by the control system and state of the rolling stock, produces the illusion of a massive piece of machinery being acted upon by a great force; the train moves slowly into motion, slowly gathering momentum, and eventually this enormous power is braked progressively to a halt.
The Conductor:
The Brakeman:
Tip 1: By providing maps and schematics in the timetable or on the layout fascia, the owner can help the crew work efficiently. Such helps can include location name, track names, car spotting locations, and even the number of cars that sidings can accommodate.
Tip 2: On a prototype railroad, engineers require years of training, experience, and exams, as well as multiple trips on a route to "learn the road." Many layout owners ask more-experienced operators (who might only have been there once or twice themselves) to work with newcomers. Knowledgeable mentors are a must for visiting crews, regardless of the visitors' experience level.
The Dispatcher:
-
Monitors movement of trains over the railroad
-
Coordinates all train movements
-
Issues orders to keep traffic moving.
-
May directly or through operators control block signals, CTC, or interlocking systems
The Yardmaster (Mole):
-
Gets a list of trains expected and called (departures) along with sorting (blocking) instructions describing which cars are going to which location.
-
Needs a white board or other mechanism to track which blocks are on which track.
-
Prepares a train for departure with the appropriate cars in the desired numbers to have trains ready when the timetable or Dispatcher requires them. Generally, the Yardmaster operates the switch engine, but in a large yard could direct other yard engineers. On a model layout they are also responsible for swapping rolling stock into or out of storage.
A Mole is a yardmaster or storage manager who builds trains in a staging area. They may use a locomotive but more often rolling stock is arranged by hand. This work may be done before the operating session or during.
The Hostler:
The Hostler generally simulates the functions of an engineer moving locomotives within engine facilities for servicing, turning, parking on appropriate tracks or in stalls, and coupling-up for outgoing trains requiring multiple engines. The Hostler assigns correct motive power to each train by picking at random from available locomotives or by following rules in a database, schedule or procedures manual. For example, each type of train may call for a particular size of locomotive or perhaps multiple units. The Hostler communicates to the road crew - engineer and conductor - and to the dispatcher the number of the locomotive assigned to the train.
The Traffic Generation Clerk:
In reality traffic is generated by the interaction between shippers and receivers and the railroad freight agent (clerk), described in this document:
The model railroad has to simulate this interaction. The Traffic Generation Clerk (often the layout owner) selects cars that will make up the train based on the needs of online industries and through traffic. If the owner has a good collection of rolling stock, they will generally put new cars into the yard and pull cars off the layout that have recently been used. The appearance of new pieces of rolling stock adds to the interest of the operating session.
The Traffic Manager Clerk (Station Agent):
The ordering and shipping representative for the industries, the Traffic Manager determines which cars come and go from each industry, the amount and location of traffic, and specifies routes. This role may be replaced by the output from a computer program to do this automatically. The process uses several documents already mentioned: car cards, waybills, and switch lists.
The Road (Track, Train) Master:
Typically, the layout owner who has absolute authority over the operating session. The owner might also act as an operating (maintenance of way) trouble-shooter and repair person. He or she keeps things moving smoothly. They will communicate with Train Crews, Tower Operators, Dispatcher as appropriate to take track in or out of service and designate alternative routes.
References
Books
-
Tony Koester: Realistic Model Railroad Operation: How to Run Your Trains Like the Real Thing Kalmbach Publishing Company (2002)
-
Bruce A. Chubb: How to Operate Your Model Railroad Kalmbach Publishing Company (1977)
Rule books (Prototype)
Rule books (Model)
Web Articles
Tools / Templates
Case Studies
Credits
Many thanks to Bob Weinheimer, MMR for giving permission to use two of his Power Point slides in this part of the Guide. They are the Car Forwarding - Switchlists slide and the Car Forwarding - Car Cards and Waybills slide from his EduTrain(r) Clinic: Getting Started In Operations.