In my first attempt at assembling an HO scale car, I had a fairly easy assignment - a refrigerator car. This time, my teacher, Rick, suggested that a passenger car would be just a little bit more complicated. Well, not really. So far, it appears to me that the model railroad manufacturing companies attempt to make their kits reasonably straightforward to assemble.
 When you open the box to compare the parts to the instruction diagram, you may be struck at the size of the car. If you do the math (10 inches times 87 divided by 12), you discover that car must have been over 70 feet long! Come to think about it, today's Amtrak cars are long too. Since the instructions did not tell me what to do when, I decided to put on the weights first. Unlike the reefer, these weights came in 2 parts and were screwed on. No need for any adhesive.
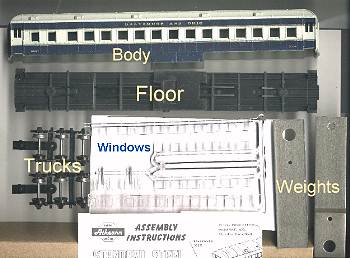
The truck and coupler arrangement is different from a freight car's. Rick said they have to be together because a long car on a small radius curve will have problems trying to stay coupled unless the couplers have a big swing. Putting knuckle couplers in the box was really no different than on the reefer - except the box is attached to the trucks instead of the car body. Remember the coupler cover has to snap on. The couplers are screwed on from the top down - don't forget the washers. This is a good time to check the coupler height and make a correction if necessary.
Now for the car body. Before you get out your Xacto knife and start cutting off window pieces, look at the instructions. The windows for the 4 side doors are individual; but the remaining windows are to be left in strips. Gluing on the windows can be done after you get all the windows in place. Go ahead and attach each window for the doors by setting the bottom in and then snapping on the top of the window. The windows for the remainder of your car come in 4 strips. The 2 longer strips have frosted window glass on them - these frosted ones are for the restrooms at one end of the car. The restroom windows are slightly narrower than those for passenger seating. Attach the long strips as you did for the door windows - set in the bottom and snap on at the top. Don't worry, there is only one way the long strips will fit in your car. The shorter window strips will complete the interior. I found out that when I joined the body to the floor, some of the window strips came loose. So I would suggest that you use just a few dabs of CA glue on the bottoms of the windows. Just a dab if you use too much, it might show when you look at the windows of your model. I also found out that if you use too much glue, it's possible to get one of your fingers glued to the car as well.
Finally, the car body attaches to the floor assembly by means of a tab at the middle of the floor to a matching slot in the body. You will notice that there are hatch-like doors that hang down about in the middle of the body - these should match a box-like protrusion under the floor. (This is where blocks of ice were placed for air conditioning! We had it all back in the olden days.) Gently spread out the sides of the body to slip over the tab. Don't glue the body to the floor because someday you may want to remove the body so you can add some interior details. Speaking of details, don't forget to glue on the brakewheel.
TOOLS AND SUPPLIES
Photo by Rick Shoup, MMR
Next: Athearn Refrigerator Car
Back To: Beginner Main Page
(Index)
Page last updated January 9, 2015